Thursday 19 September 2013


Thursday 9 May 2013
Friday 3 May 2013
Nokia X3 ( 5 )
Nokia x3 sim way 100000% tested

Nokia x3 keys problem solution

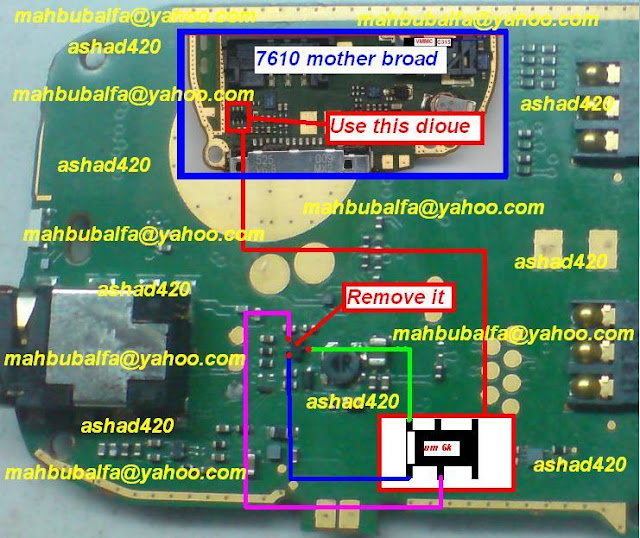
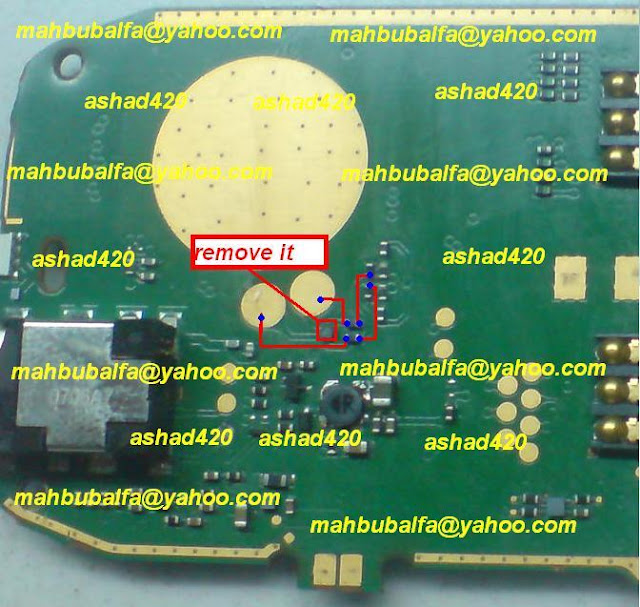
Nokia X3 Short Solution

Nokia x3 short solution

Nokia X3 usb ways solution


Saturday 20 April 2013
Thursday 18 April 2013
Coby Kyros MID7010 (MID 7010) FACTORY RESET, Rooting, Android Market
Coby Kyros MID7010 (MID 7010) FACTORY RESET, Rooting, Android Market
Below is the procedure to FACTORY REST, ROOT AND MArket installation for COBY KYROS MID7010 or MID 7010 Tablet owners stuck at white boot screen OR android OS not loading after any manipulation with the firmware OR interested in rooting and installing google market.
FACTORY RESET Steps:
1. Turn OFF the device
2. Make sure its turned OFF
3. Press and hold simultaneously POWER, BACK (return) and HOME buttons
4. The device turns on with COBY logo, keep pressing......
5. After about 10 to 15 seconds the display asks to press the keys again within 5 secs to factory reset the device.
6. LEAVE the power button now while still pressing HOME and BACK keys
7. FActory reset is initiated!
TO INSTALL MARKET AND ROOT:
1. Run SuperOneClickv2.3.2-ShortFuse.zip
2. Will prompt to force install drivers ( if the adb device drivers not available), accept and sit back! the program will not respond for a while 10-15mins and prompts back that the drivers are installed.
3. Run root!
4. Open root explorer or any file browser accepting root, browse to system/app copy all files in attached folder (apks) here, if prompts to rewrite( do not allow!)
5. Change permissions of the copied files as in other apks in system/app folder.
6. Google market app appears in app drawer.
7. Run and Enjoy!
GOOGLE MARKET


How To Update Firmware Of Samsung S7350 Ultra S
Firmware Update Steps:
- Run Samsung S7350 Ultra S Downloader.
- Check MSM6275/MSM6280/MSM6290 option.
- In case you want to flash Boot files to your phone check Full Download option.
- Click Boot button and show the program the Boot files folder.
- Click Amss button and select this file: amss.bin
- Click Rsrc1 button and select this file: Rsrc_S7350_Open_Europe_Common.rc1
- Click Rsrc2 button and select this file: Rsrc2_S7350(Low).rc2
- Click Factory FS button and select this file: FactoryFs_S7350_Open_Europe_Common.ffs
- Put the phone into download mode: Press ( * ) Key + Power
- Connect USB cable to phone and click Port Search button.
- When the program detect the Com number that the phone takes click Download button to start the process.
- Do not touch the phone or cable till all is done and the phone restart.
- After reboot the phone you can do full reset by this Code: *2767*3855#.
How To Update Firmware Of Samsung I8150 Galaxy W
Firmware Update Steps:
- Make sure that these options is checked: Auto Reboot, Protect OPS.
- In this step you must select the Firmware filess:
OPS: Ancora.ops
BOOT: APBOOT_I8150xxxxx...
Phone: MODEM_I8150xxxxx...
PDA: PDA_I8150xxxxx...
CSC: CSC_GT-I8150-MULTI-CSC-xxxxx...
- Put your phone into Download Mode: Volume Down + Home + Power
- Press Volume Up to get the Download Mode.
- Connect USB cable to Phone and PC and install Drivers ( if not installed before )
- Make sure that the program detect the Com port which the phone takes.
- Click Start button and wait till you see PASS word on the program.
- Disconnect the Phone and Make Full Reset: *2767*3855#
Notice: In case the Firmware package contains only one file then check ( One Package ) option in the program and select it in the field ( One Package ).
How To Update Samsung S3850 Corby II Firmware Using Multiloader Program and USB Cable
Tools And Files You Need:
- Put the phone's battery back but do not turn it on.
- Connect USB cable to phone and PC, Then wait until Windows detects it and install the needed drivers for it.
- Samsung S3850 Corby II Firmware Package: Download it and extract it.
- Multiloader program: Download it and extract it too.
- Samsung S3850 Corby II Original USB Drivers: After downloading the drivers you have to install it on your PC, Then restart the PC.
- USB Cable: You can use Samsung S3850 Original USB cable, Or any suitable one.
Samsung S3850 Firmware Update Steps:
- Turn off your Samsung S3850 and take out its battery, SIM Card, And MMC card too.
- Turn off your Samsung S3850 and take out its battery, SIM Card, And MMC card too.
- Run Multiloader.exe program.
- Select BRCM2133 as CPU type.
- In case you want or need to flash Boot files too, Then check Full Download option, Otherwise leave it unchecked.
- Now you have to select the following files from the extracted firmware folder:
Click Boot button to select the complete Boot files folder.
Click Boot button to select the complete Boot files folder.
Click Apps button to select: apps_compressed.bin
Click Rsrc1 button to select: Rsrc_S3850_xxxx_xxxxxx_Common.rc1
Click Rsrc2 button to select: Rsrc2_S3850(Low).rc2
Click Factory FS button to select: FactoryFs_S3850_xxxx_xxxxxx_Common.ffs
Click CSC button to select: CSC_S3850_xxxx_xxxxxx_Common_Oxx.csc
Click SHP APP button to select: ShpApp.app
- Put the phone's battery back but do not turn it on.
- Put your phone into Download Mode:
Press and Hold Volume Down Key + Send Key then press Power Key.
- Connect USB cable to phone and PC, Then wait until Windows detects it and install the needed drivers for it.
- Click on Search Port button, And Multiloader program will detects the phone's Com port number.
- Now you can start the update by clicking Download button.
- Multiloader program will update your phone and reboots it after that.
- Disconnect the USB cable from phone.
- When your phone is fully on, Do full reset using this code *2767*3855#
- Wait for your phone again, And after it reboots you can start using it with the new firmware version.
Important Notice:
No need to flash Boot files unless you must do so, In some cases the
phone will not work normally if you did not flash them, So first try to
flash only Firmware files.
How To Update Samsung M8910 Pixon 12 Firmware
This model of Samsung phones comes with Touch Screen ( AMOLED resistive touchscreen, 16M colors )
and
its software is so easy to deal with, so a lot of users like it so much
and here we will give you the right guide to update the firmware of Samsung M8910 Pixon 12.
Tools: Samsung M8910 Pixon 12 Downloader - USB cable.
How To Update Samsung P6200 Galaxy Tab 7.0 Plus Firmware
Update Steps:
- Extract The Downloaded Flasher,Firmwares package and USB drivers.
- Install the USB drivers and Reboot your PC.
- Run Odin Flasher and check these options: Re-Partition, Auto Reboot, F.Reset Time.
- From the Extracted Firmware Package select the files in this order:
- PIT: px_20111010_3G_16G.pit
- BOOTLOADER: P6200_APBOOT_P6200xxxxx_CL598906_REV02_user_low_ship.tar.md5
- PDA: P6200_CODE_P6200xxxxx_CL598906_REV02_user_low_ship_16G.tar.md5
- PHONE: MODEM_P6200xxxxx_REV_04_CL1083081.tar.md5
- CSC: GT-P6200-CSC-MULTI-xxxxxx.tar.md5
- At this Step you have to put the phone into Download Mode ( Volume Down + Power Key for 10 Sec ) then Press Volume Up Key to Enter Firmware Download Mode.
- Connect USB cable to Phone and PC then install needed Drivers.
- Make sure that the Odin Flasher Detects the COM number that the phone takes.
- Click Start button to update the phone with these Firmware Files.
- When all is Done in the right way the Odin Flasher will gives PASS! word In Green.
- Now you can Remove cable from phone.
- Do Full Reset by Code: *2767*3855#.
How To Update Samsung Galaxy Premier I9260 Firmware Using Odin Program And USB Cable
The Firmware Update Steps: Read the following steps first and understand them completely before starting the process.
1 - Make sure that your Galaxy Premier phone is off, Then take out its battery, SIM card, And memory card too.
2 - Double click on Odin3.exe program.
3 - At Odin's window check the following:
Re-Partition, Auto Reboot, F.Reset Time
4 - Now you will select the needed firmware files to be installed by Odin on your phone, Do it in these order:
- Click on PIT button and select GT-I9260_EUR_XX_20120711.pit
- Click on Bootloader button and select BOOTLOADER_I9260xxxxxx_...user_low_ship.tar.md5
- Click on PDA button and select PLATFORM_I9260xxxxxx_...user_low_ship.tar.md5
- Click on PHONE button and select MODEM_I9260xxxxxx_REV_00_xxx....tar.md5
- Click on CSC button and select CSC_Oxx_I9260Oxxxxxx_REV00_user_low_ship.tar.md5
5 - Odin can install the above files when your phone is into Download Mode only, To put it into that mode do these steps:
- Put its battery back, But do not turn it on.
- Press Volume Down button + HOME button + Power button until you get the warning message on your phone screen, Now release the three button and press Volume UP button only, Now you are into download mode.
- Press Volume Down button + HOME button + Power button until you get the warning message on your phone screen, Now release the three button and press Volume UP button only, Now you are into download mode.
6 - Using the USB cable connect your phone to the PC.
7 - Let your PC detects the new device and install any needed drivers for it, When done continue to the next step.
8 - Look at Odin's window to see if Odin detects your phone correctly, You should see 0:[COMxx] when xx is the com number of your connected phone.
9 - In case that Odin could not detect your phone, Disconnect and connect it again, Or even you can restart your PC.
10 - At this step you are ready to begin the update, All you need to do is to click on START button at Odin's window.
11 - Odin will start to install the firmware files on your Galaxy Premier, So wait until the job is done.
12
- Do not try under any condition to disconnect the USB cable or phone,
And never interrupt Odin program during this process, Otherwise you may
kill your phone.
13 - After the update process is done your phone will be rebooted, So wait for it.
14 - You can know if the update process is done successfully by looking at Odin's window, If you see the word PASS! then everything is ok.
15 - After your phone is on, Disconnect the USB cable from it.
16 - Do Full reset to your phone using this code: *#87976633#.
17 - Your phone will be rebooted again after entering the above code, So it is normal, Just wait for it.
18 - Now your phone is under your control with its new firmware, Customize it and enjoy your job.
- The Update or Flash operation will not Sim-Unlock your device ( Unlock I9260 Galaxy Premier ).
- Use Stable PC for the update and never use USB Hub to connect the device.
- If the firmware package contains only one big file then use it in PDA field and no need to check Re.Partition option or use Pit file.
How To Update Firmware Of Samsung I9088 Galaxy S
Firmware Update Steps:
- Run Samsung I9088 Galaxy S Download program.
- Check these Options: Auto Reboot + F.Reset Time.
- Select the PIT, PDA, PHONE & CSC file.
- Put Device Into Download Mode ( Press Volume Down + Volume Up then connect cable ).
- Make sure ID:COM box highlighted Yellow that the device is connected to the PC.
- Start Downloading By pressing Start Button.
- Wait for "Pass" to be appear on the screen.
- After all is done reboot the phone and Do Full Reset: *2767*3855#.
How To Unlock The Bootloader of Samsung Nexus 10 - P8110
The Samsung Nexus 10
comes with locked bootloader by default, But unlocking it is possible,
After you do it you will be able to access everything in its Software
& Hardware without limitation, Also you should know that others can
access them too, Specially your personal data, So be aware.
Keep in mind that the unlock operation will wipe all your saved data, So make a backup of everything you don't want to loose.
The needed Tools and Files:
- The original USB cable of your Samsung Nexus 10.
- Samsung Nexus 10 Fastboot Drivers: You can download it Here, Extract it to be used later.
- Fastboot Tool: Download it from Here, Extract it to C:\ to use it later.
Bootloader Unlock Steps:
1- Turn Off your Nexus 10.
1- Turn Off your Nexus 10.
2- Put your Nexus 10 into Fastboot mode: Hold Volume Up Key + Volume Down Key then press Power Key until get the Fastboot menu.
3-
Connect your Nexus 10 to your PC via its USB cable, When your PC asks
you for drivers browse for the extracted Fastboot Drivers folder.
4- Wait until USB drivers installed correctly.
5- From Start menu go to Command Prompt ( Black window with white input text ).
6- If you are not at C:\ then In the opened black window type CD.. and hit enter until you are in C:\
7- Now type: CD fastboot to get into fastboot folder.
8- Type this command: fastboot devices and hit enter.
9- Now you should get your connected device ID, So everything is ok till now.
10- At this step you have to type this command and hit enter: fastboot oem unlock
11- Look at your Nexus 10 screen to verify the command by selecting YES
12- Your tablet will reboot and all your data will be deleted.
13- Now your Nexus 10 Bootloader is unlocked, So you can install custom roms, Custom recovery and more.
Notice: In case you want to relock your Nexus 10 bootloader all you have to do is changing the command in step 10 to: fastboot oem lock
Notice: In case you want to relock your Nexus 10 bootloader all you have to do is changing the command in step 10 to: fastboot oem lock
Subscribe to:
Posts (Atom)